Building a better OpenSCAD customizer
A look at how parametric UI layers for OpenSCAD evolved from Thingiverse magic comments in 2013 to today's cloud renderers, and the design choices behind ModelRift's implementation.
OpenSCAD is code-first by design. You write variables at the top, geometry below, and anyone who wants a different size has to open the file and change a number. For developers this is fine. For the person who just wants a slightly wider cable clip, it’s an obstacle.
The customizer - a UI layer that reads those variables and renders sliders and dropdowns without touching code - is one of the more useful ideas to come out of the maker movement. It’s also a surprisingly good case study in the tradeoffs between simplicity, power, and compatibility. Thirteen years of development produced several different syntax “flavors,” a few false starts, and at least one platform that built a whole business around a feature OpenSCAD shipped experimentally.
Where it started: Thingiverse Customizer (2013)
In early 2013, MakerBot launched the Thingiverse Customizer. The idea was straightforward: upload an OpenSCAD file, and Thingiverse would parse it and render an interactive web form. Users could adjust parameters and download a ready-to-print STL without ever seeing the code.
The technical challenge was that OpenSCAD had no concept of UI metadata. The language describes geometry, not interfaces. The Thingiverse team solved this with what the community eventually started calling “magic comments” - structured annotations embedded in regular code comments that the web parser could read without affecting local execution.
The convention was simple. Put your parameters at the top of the file, before any modules or functions. A bare number becomes a text input. Add a comment with a range and it becomes a slider. Add a list of options and it becomes a dropdown:
// Width of the clip in mm
width = 30; // [10:100]

// Clip style
style = "round"; // [round, square, chamfered]
This worked because OpenSCAD ignores comments entirely. The same file runs identically on a local machine; only the Thingiverse parser sees the hint. A designer could build a complex model, annotate the important variables, and hand it to someone with no programming background. The winner of the 2013 Customizer Challenge included a parametric music box and a wall plate system that let users configure outlet configurations from a web form.
The constraints were real though. Everything had to live in a single .scad file - include and use statements referencing external libraries caused the parser to fail. Non-ASCII characters in comments broke things silently. And the web renderer used an older geometry kernel that sometimes produced different results than the desktop application, which confused both designers and users.
Moving to the desktop: GSoC 2016 and OpenSCAD 2019.05
The web-only customizer created an uncomfortable split. Designers couldn’t preview their UI widgets locally. They’d annotate a file, upload it, and only then discover a slider had the wrong range or a dropdown was missing an option. The round-trip was slow.
This friction became a Google Summer of Code project in 2016. The goal was a dockable panel inside the OpenSCAD desktop application that would read the same comment-based metadata and render native widgets. Getting there required OpenSCAD to do something it hadn’t needed before: static analysis of the top-level assignments. The code that ran geometry at render time wasn’t the right tool; the customizer needed to read variable names and default values without executing the full script.
The 2016 work laid the foundation, but the native Customizer stayed experimental for three more years. It shipped officially in OpenSCAD 2019.05, which remains the baseline most designers assume when they write customizer-compatible files today.
The 2019.05 release added a few things that the Thingiverse implementation didn’t have. The most useful was the JSON preset system: you could save a named configuration to a .json file alongside your .scad file, then switch between presets from the UI. This made it practical to ship a design with several ready-made variants (“compact”, “standard”, “large”) that users could select without adjusting any sliders. The presets are also usable from the command line:
openscad -o variant-compact.stl -p presets.json -P compact model.scadThe other addition that mattered was the /* [Hidden] */ section. Variables after that comment appear in the JSON export but not in the UI. This let designers hide internal constants, debug flags, and intermediate calculations that weren’t intended for end-users. Before this, the only way to hide something was to put it after the first { character in the file - a convention that worked but relied on an implementation detail rather than a supported feature.
The syntax in detail
The full customizer syntax is worth understanding because the choices are non-obvious. The OpenSCAD User Manual on Wikibooks covers all of it, but here’s what actually matters in practice.
Widget types are inferred from the variable type and the comment hint, not declared explicitly:
- A number with no hint (
width = 30;) becomes a spin box with arrows. Decimal numbers (width = 30.5;) use 0.1 step increments by default. - A number with a range hint (
// [10:100]) becomes a slider from 10 to 100. - A number with a step hint (
// [0:5:100]) becomes a slider with step 5. - A string with a list hint (
// [round, square]) becomes a dropdown. - A number with a list hint (
// [1, 2, 3]) also becomes a dropdown. - A boolean (
enabled = true;) becomes a checkbox automatically. - A vector of up to four numbers (
dims = [10, 20, 5];) becomes a row of spin boxes.
Labeled dropdowns use a colon separator between the display label and the value:
// Screw size
screw = "M3"; // [M2:M2 (1.6mm), M3:M3 (2.5mm), M4:M4 (3.3mm), M5:M5 (4.2mm)]
Grouping with tabs is done with block comments:
/* [Dimensions] */
width = 80;  // [20:200]
height = 30; // [10:100]

/* [Options] */
add_lid = true;
corner_style = "round"; // [round, square]

/* [Hidden] */
debug = false;
The [Global] tab name is special: parameters in it appear on every tab. [Hidden] suppresses parameters from the UI entirely.
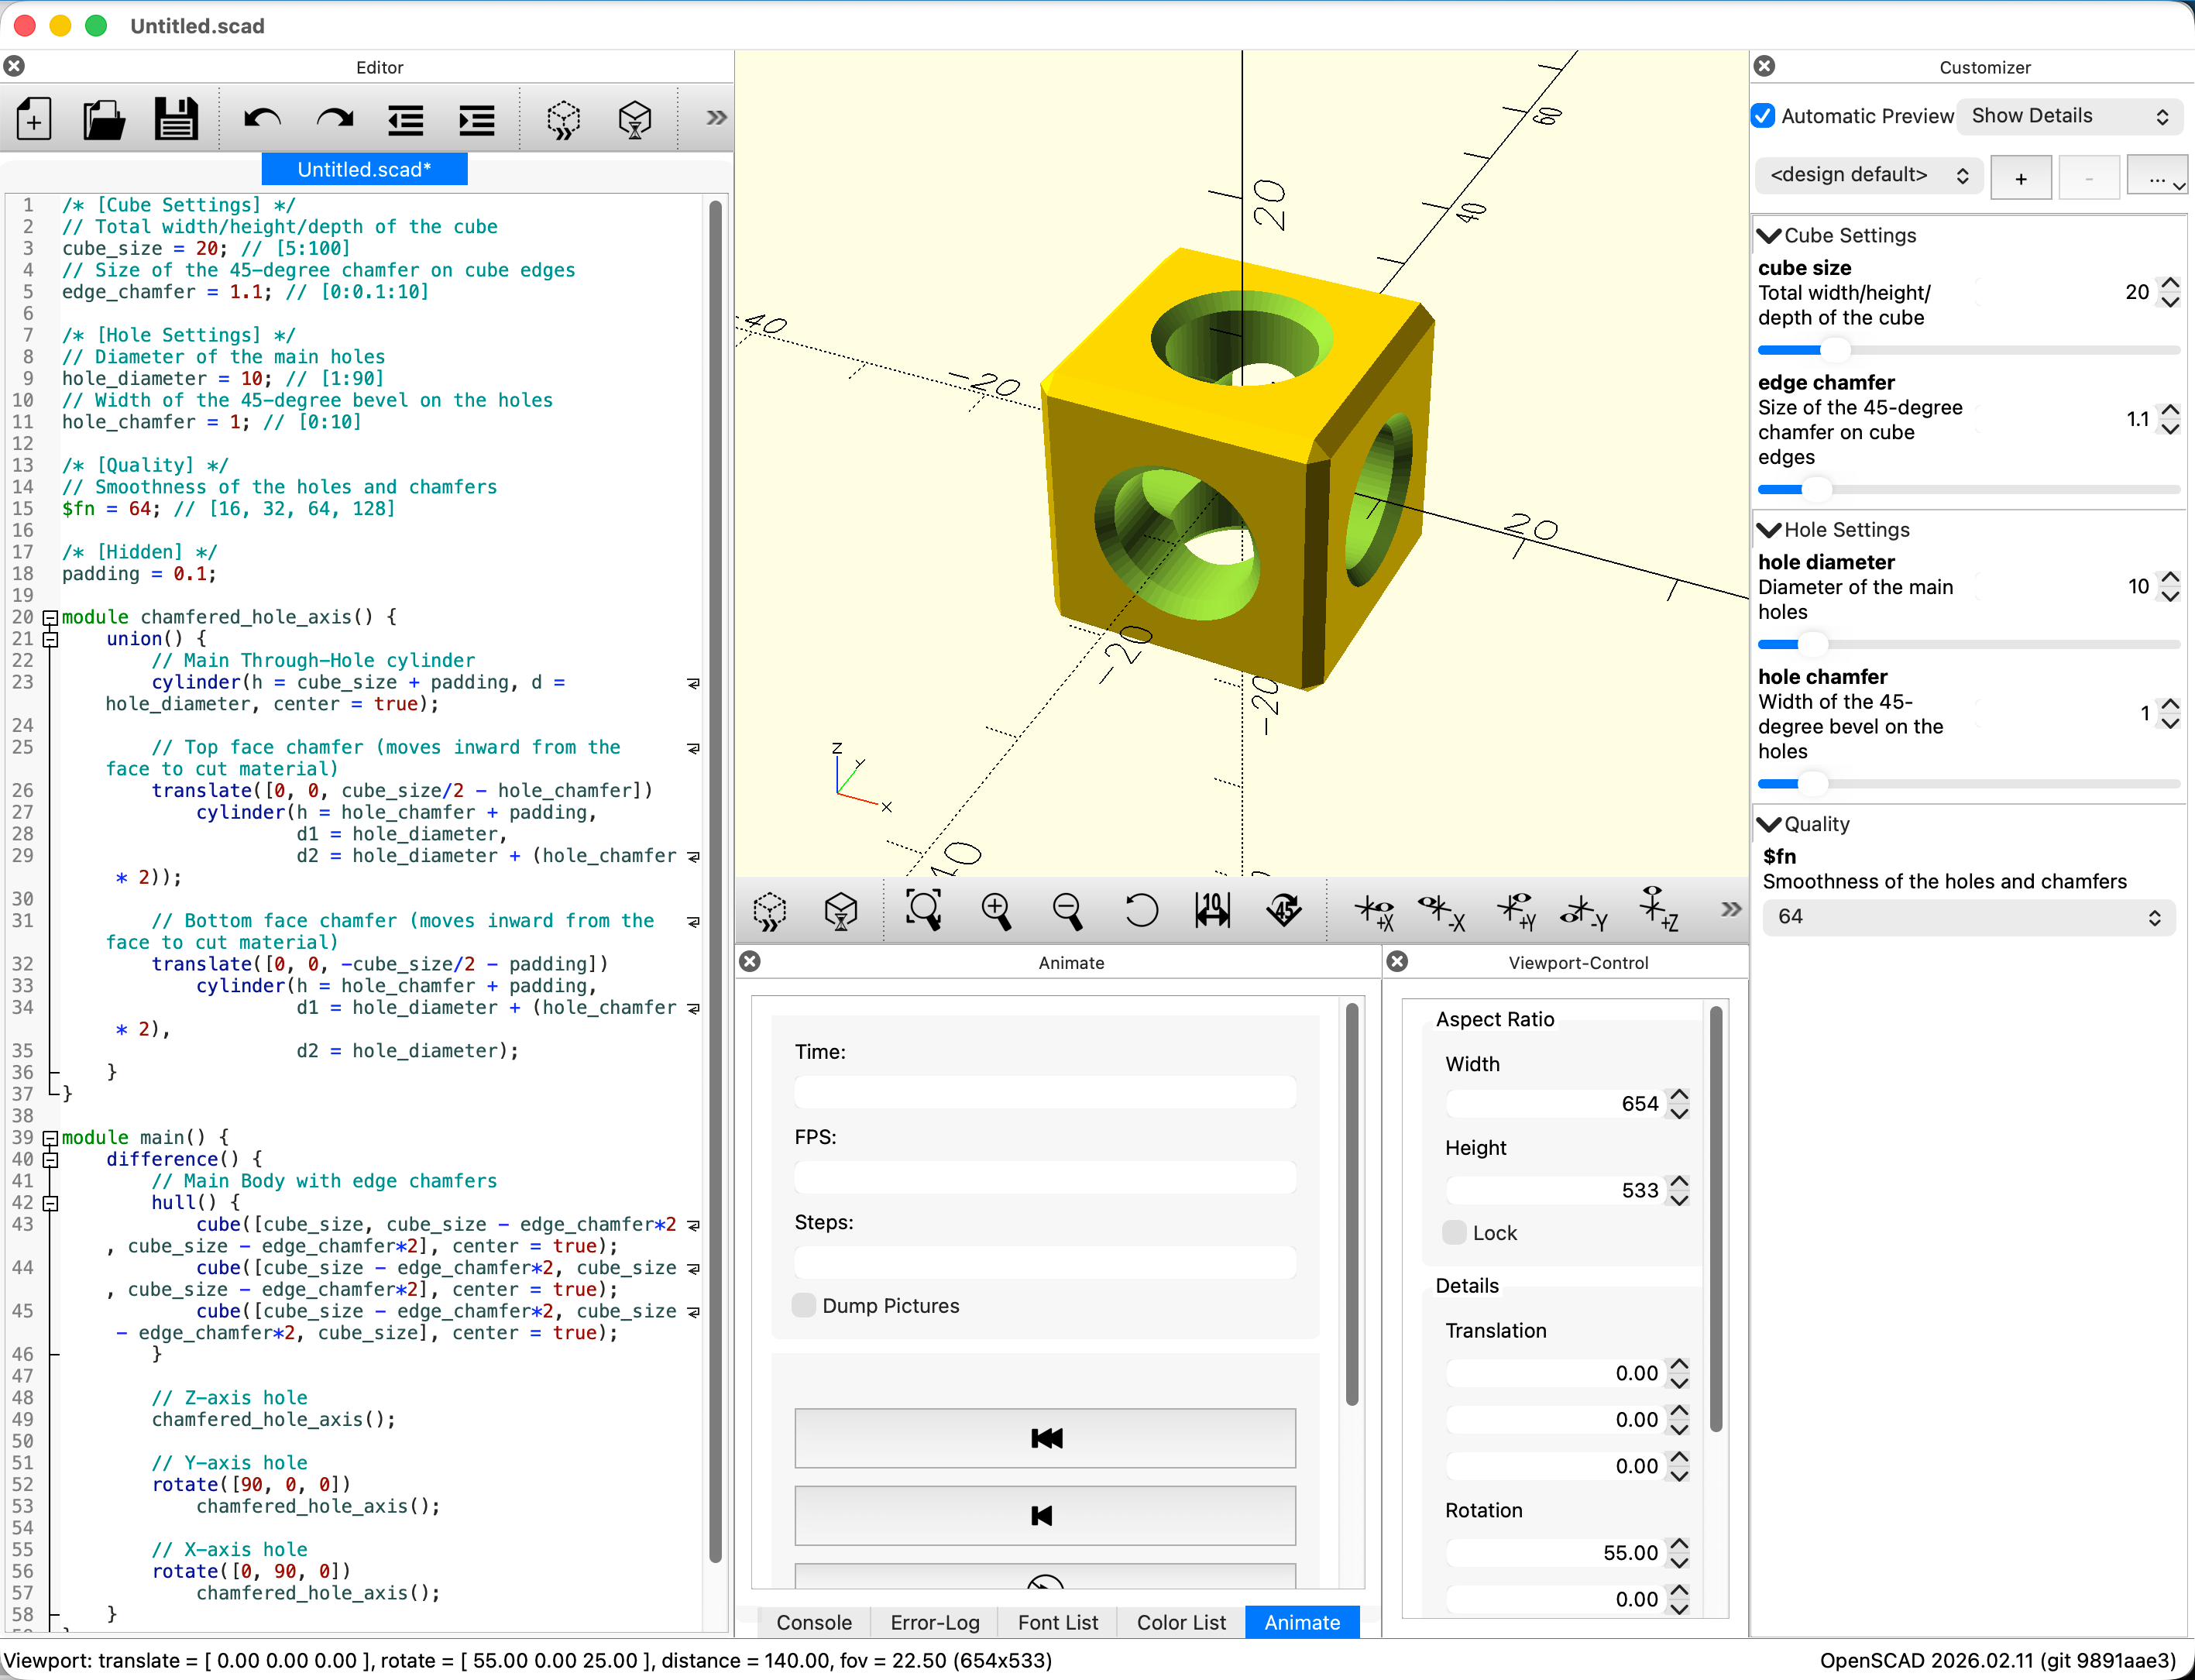
The native OpenSCAD customizer panel on the right, generated from magic comments in the script.
One thing the syntax cannot do is conditional visibility - you can’t make a parameter appear only when another parameter has a certain value. This is probably the most common feature request. The GitHub issue tracking it goes back years. For now, the standard workaround is documenting the dependency in the description comment and accepting that users will sometimes see irrelevant sliders.
MakerWorld and the cloud customizer revival
Thingiverse’s importance in the 3D printing community declined through the early 2020s, partly due to technical problems and partly due to competition. Bambu Lab’s MakerWorld platform, launched in 2023, brought the cloud customizer idea back with more resources behind it.
MakerWorld’s Parametric Model Maker runs on OpenSCAD 2021.01 server-side but adds extensions that go well beyond the standard syntax. The most interesting one is a // font tag for string variables, which replaces the standard text input with a font selector that pulls from Google Fonts. Before this, fonts in OpenSCAD designs were notoriously fragile - a model that used a specific font would look different (or fail silently) on machines where that font wasn’t installed. The font selector sidesteps the problem by handling font provisioning server-side.
MakerWorld also pre-installs major libraries (BOSL2, UB, KeyV2) in its rendering environment. This removes the single-file constraint that made the original Thingiverse Customizer painful to use for complex designs. A model can now use <BOSL2/std.scad> and the web renderer will find it.
The platform also incentivizes the creation of parametric models directly, through a points system tied to how often a model gets customized and printed. Whether that’s a good dynamic for the quality of public models is an open question, but it has produced a large catalog of actively maintained parametric designs.
Alternatives outside the OpenSCAD world
OpenSCAD isn’t the only code-based parametric modeling tool, and its customizer approach isn’t the only way to solve the “how do users set parameters” problem. Looking at the alternatives clarifies why the comment-based approach was chosen and what it gives up.
OpenJSCAD (JSCAD) runs the same CSG concepts in JavaScript, in the browser. Parameters are declared as JavaScript objects rather than inferred from comments:
function getParameterDefinitions() {
  return [
    { name: 'width', type: 'float', initial: 30, min: 10, max: 100 },
    { name: 'style', type: 'choice', values: ['round', 'square'], initial: 'round' }
  ];
}
This is more explicit than magic comments - the UI definition is code, not metadata. You get type safety and you can write logic in getParameterDefinitions() to produce dynamic option lists. The tradeoff is that the parameter declaration is separate from the variable use, and the file format is incompatible with desktop OpenSCAD. The JSCAD documentation on parameters covers the full API.
CadQuery is a Python library built on OpenCASCADE, giving it access to a B-Rep geometry kernel rather than the mesh-based CGAL that OpenSCAD uses. We covered the kernel differences in why we built ModelRift on OpenSCAD. For parametric UI, CadQuery uses the CadQuery Gateway Interface (CQGI), which introspects Python variable annotations:
length = 80.0 # name: "Length", type: "float", min: 10, max: 200This is still comment-based, but structured as key-value annotations rather than range hints. The CQGI executor parses these to build the form. The advantage over OpenSCAD’s approach is that you’re using the same Python tooling as the rest of the file - no separate syntax to learn. The disadvantage is that executing arbitrary Python on a server is significantly harder to sandbox safely.
Grasshopper / ShapeDiver is how the architecture and industrial design world handles this. Grasshopper is a visual programming environment for Rhino. Parameters appear as sliders and toggles in the Grasshopper canvas, and ShapeDiver wraps a Grasshopper definition in a web API. The parameter system supports dynamic UI - disabling inputs based on other values, showing different fields depending on mode selection - which OpenSCAD’s flat list of sliders cannot do. The geometry kernel is NURBS rather than mesh, which matters for precision manufacturing but less so for 3D printing.
Onshape FeatureScript takes the most formal approach. Parameters are defined with explicit type annotations and UI hints inside structured “annotation maps”:
annotation { "Name" : "Length" }
isLength(definition.myLength, { (inch) : [0, 1.75, 10] } as LengthBoundSpec);
FeatureScript supports editing logic functions that run when any parameter changes and can dynamically modify the UI state - graying out fields, updating ranges, showing or hiding sections. This is what dynamic customizer behavior looks like when you design for it from the start rather than bolting it on later. The FeatureScript documentation is worth reading even if you’re not using Onshape, just to see what a fully realized version of this problem looks like.
The pattern that emerges is a tradeoff between formality and accessibility. Comment-based hints are the least formal and the easiest to adopt - you’re already writing variable declarations, you just add a comment. Object-based declarations (JSCAD) are more explicit but still lightweight. Annotation maps (FeatureScript) and type-annotated Python (CQGI) give you more power at the cost of more syntax to learn. Visual programming (Grasshopper) removes the text syntax entirely but requires a different mental model.
OpenSCAD went with the least formal option, which made the customizer easy to use for the community that already existed - and hard to extend later.
What ModelRift does with this
ModelRift parses the same magic comment syntax that desktop OpenSCAD and Thingiverse use. When you open a session with customizer-compatible parameters, you get a panel with sliders, dropdowns, checkboxes, and spin boxes generated from the code - no annotation required beyond what you’d write for the desktop customizer anyway.
Customizer controls are now also available on public model pages in the Models gallery, so people can tune parameters directly in the viewer before downloading STL.
The implementation parses widget types from the same rules: range comments become sliders, list comments become dropdowns, booleans become checkboxes. Tabs work through the /* [Tab Name] */ syntax. Hidden parameters aren’t shown.
There are two ways to use a customized value. “Redraw preview” rerenders a temporary STL from the current slider state without saving anything - useful when you’re exploring a range. “Save parameters” writes the current values back into the SCAD source as new defaults and creates a new revision in the session history. The second operation triggers a full render and adds to the diff history, so the change is permanent and auditable.
One thing we handle that desktop OpenSCAD doesn’t: when the SCAD source changes (because the AI updated it, or you edited code directly), the customizer panel refreshes automatically. There’s no manual step to reload the parameter list. The panel tracks SCAD version numbers and re-parses when it detects a newer one, which keeps the UI synchronized with the code.

ModelRift’s customizer panel alongside the 3D viewer. Changing a value and clicking “Redraw preview” rerenders the STL without saving.
The customizer isn’t a replacement for editing code - it can’t add new parameters or change the model’s structure. It’s for adjusting values within the design space the code already describes. For that use case, parsing the existing OpenSCAD syntax rather than inventing a new one seemed like the right call: any design that works on the desktop or on Thingiverse works in ModelRift without modification.
Further reading:
- OpenSCAD User Manual: Customizer - the canonical syntax reference
- Why ModelRift uses OpenSCAD - geometry kernels, sandboxing, and why LLMs generate better OpenSCAD than CadQuery
- 3D file formats explained - STL, 3MF, STEP, and when each one matters
- JSCAD parameter documentation - the object-based alternative
- ShapeDiver parameter settings - how Grasshopper handles web customization